Why do I always apply a filter and why does it have to be this one? What does Rz mean again and why do we measure profile roughness and not surface roughness? Regardless of whether you are new to the topic of roughness measurement or are already a professional in surface structure measurement, there is a lot to learn. Here you will find the most important terms in a simple and understandable way. Let's start at the very beginning.

Which surface is rougher? Which one is better? It all depends on the functionality it's supposed to have.
Roughness is the condition of an object's surface. Let's call it the "unevenness". Now, most surfaces of components are not flat, but are primarily determined by their functional form. The first step is to remove this shape so that the texture of the surface remains. After all, the shape itself may have heights and depths, but these are geometrically intended to be so. No matter how small they may be, they have nothing to do with the roughness. Therefore, the shape is subtracted for the time being. But that is not all, because the surface is characterized by high and low frequency waves. High-frequency waves are the roughness you want to measure. That means you still have to get rid of the low-frequency ones, the so-called waviness. And for that, in turn, we need a filter.
This is a question you are now legitimately asking yourself when you want to perform a surface roughness measurement. Or not, because you already work with Bruker Alicona measurement technology and therefore know that this is done with a few mouse clicks. Examples of geometric shapes are:
After form removal, a flat surface remains for evaluation.
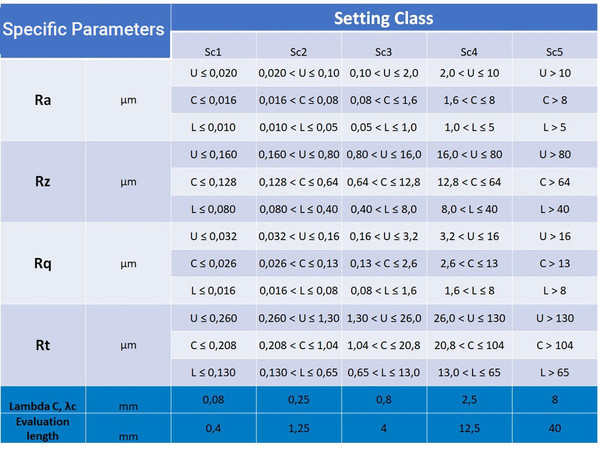
In order to be able to deduct the waviness after the shape, there are two different methods in roughness measurement, depending on the preceding level of knowledge. Both procedures have one thing in common: they are based on Lc (LambdaC). Lc is the cutoff wavelength, the length that separates waviness from roughness. Or to put it more simply: higher frequencies remain in the surface, lower frequencies are filtered out. But how do you get the right Lc value? There are two possibilities:
1. Lc can be seen in the drawing.
2. The drawing does not give any information about Lc. In this case, assume your nominal roughness value and the Setting Class and look for your corresponding Lc in the table. See figure below.

Table to determine Lc
Now this all sounds insanely complicated. However, the good news is that Bruker Alicona's software (MetMaX) already gives instructions on how to perform a roughness measurement in compliance with the standard. The table for determining Lc according to ISO 21920 is also implemented.
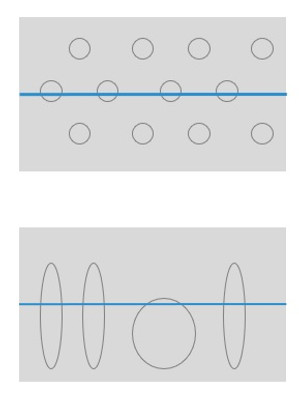
Actually, it should be called profile roughness measurement and areal roughness measurement, because it is about the way of measuring. They are two different measurement methods for determining roughness, although different results are obtained. The name already reveals what is involved: profile roughness measurement takes its values from a line, while surface roughness measurement evaluates an entire surface.
Profile roughness measurement is widespread and thus better established than areal surface determination. This is because roughness on the profile has been measured for decades. The result values may be Ra (mean roughness), Rq (root mean square) and Rz (roughness depth) to name just a few. The standards behind these are extensive, but we will go deeper to the standards in a different article. To get meaningful results, the metrologist must already have some knowledge of the surface and have an idea of what they are doing.
Surface measurement is newer. In the past, roughness was measured with tactile systems. Tactile means that a probe moves over the component and thus determines where there are highs and lows. With such a roughness measuring device, it is not possible, or possible only with extremely high effort, to perform a surface measurement. Only non-contact methods make areal surface measurement possible. The results are more complex and comprehensive. In addition to Sa (mean arithmetic height), Sq (mean square height) and Sz (maximum height), you receive many other parameters, such as the volume parameters, which also allow better conclusions to be drawn about the function of the surface. With these parameters, you can make statements about haptics, friction or sliding features. The outcome is also more reliable and repeatable. Furthermore the surface measurement is safer against user influences. The figure below shows you, why in most cases the areal roughness measurement is way more meaningful.

Same profile, but totally different roughness
So that you also know which values are behind which terms, we provide you with a short glossary. You have already heard some of them:
Ra, the arithmetic mean roughness value, is the integral of the absolute roughness value (shaded area) divided by the measured distance I.
Rq is the root mean square value of the roughness of the profile
Rt: total height of the roughness profile
Rmax: Maximum height of the roughness profile within a single measuring section
Rz: Averaged height of the roughness profile
Rp: Height of the largest profile peak (roughness profile)
Rv: Depth of the largest profile valley (roughness profile)
Rk: Core roughness depth, height of the core area
Rpk: Reduced peak height
Rvk: Reduced groove depth
Sa: Arithmetic mean of heights of selected area
Sq: root mean square of the heights of the selected area.
Sz: maximum height of the selected surface
Vvc: Empty volume of the core area of the surface
Vmc: Material volume of the core area of the surface
Vvv: Empty volume of the valleys of the surface
Vmp: material volume of the uppermost peaks of the surface
Spk: Reduced tip height, average height of the protruding tips above the core area
Svk: Reduced groove depth, mean depth of profile valleys below core area
We hope our explanations help you to better understand the topic of roughness measurement and explains why you perform which steps in the application. Although the topic of roughness may seem very extensive and complicated, Bruker Alicona's measuring instruments are also perfect for getting started with roughness measurement. The software is equipped to make surface determination as easy as possible for you and our support team helps with problems and knowledge gaps.
Would you like to optimize your measurement processes and achieve high-precision measurement results? Our poster on optical roughness measurement contains metrological terms, measurement tasks, know-how tables, ISO filters and LC filters to support a smooth measurement process.