Et comment diable vérifiez-vous leur géométrie ?
It's just the way life goes: You have a super important task and nobody knows about it. The best example is cooling holes in turbine blades. Very few people even know that they exist. Let alone what they are used for. Yet it is precisely these cooling holes that not only increase efficiency but also save lives in the aviation industry.
Let's clear things up: Cooling holes in turbine blades are hugely important. They may be tiny little holes, but they fulfill very important tasks. The fact is that current compressors achieve far higher outlet temperatures than would be beneficial to the material of the turbine blade. The blade material must therefore be protected. And that is exactly what these small holes in the turbine do. They ensure that film cooling is applied to the outer surfaces of the turbine blades.

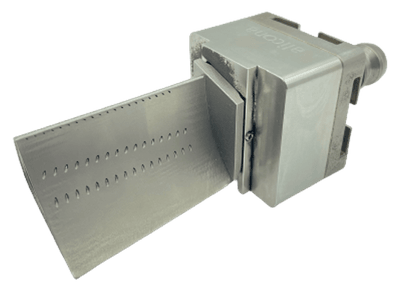
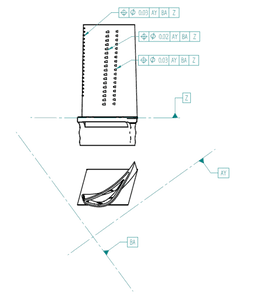
Cooling Holes on a Turbine Blade

Inspection of the Cooling Holes
The high temperatures in an airplane's compressor provide more efficiency on the one hand and lower fuel consumption on the other. That both sounds good, doesn't it? However, if the small holes did not do their cooling work, the material would melt. So cooling holes are needed to prevent turbine failure and guarantee safety during flight. Incidentally, turbine blades with cooling holes are not only used in aviation. The energy sector also uses the small holes that protect the blades from heat.
It is clear that these holes fulfill an important task by protecting the turbines from overheating damage. This also leads to the conclusion that the correct positions, shapes and distribution should not simply be left to chance. Cooling holes are quite a challenge for quality assurance for the following reasons:
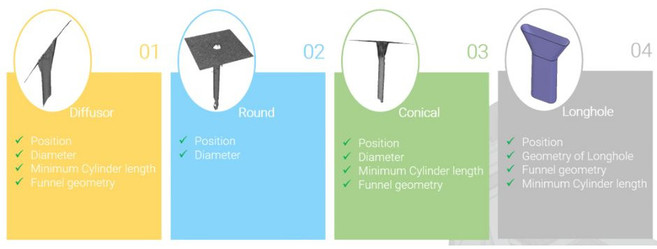
Not all cooling holes are the same. We can classify them according to their shapes:

Different shapes of Cooling Holes and the applicable measurement tasks
Depending on the shape of the cooling bore, the position, diameter, funnel geometry or minimum cylinder length must be checked. This is quite a challenge for measurement technology. In fact, very few systems are suitable at all. Purely tactile measuring methods fail not only because of the small diameters or the inclination of the bore, but also because of the curvature of the turbine blade itself.
Bruker Alicona has a clean solution for obtaining all the parameters of the cooling holes. A single device - the µCMM - combines two measurement technologies to obtain the desired 3D data. It works like this: Vertical Focus Probing is used to measure the cylindrical part of the cooling hole. The surface, i.e. the conical part of the hole, is the task of Advanced Focus Variation. By using a lens with a super-large working distance, the user does not have the slightest accessibility restrictions.
So all you need to perform a safe, repeatable quality check on your cooling holes is the Bruker Alicona Cooling Hole package, which consists of the following components:
This package not only makes it possible to inspect cooling holes, but also automates this complex application. You can see the processes in the graphic below. First, the cooling hole is aligned so that it is perfectly centered in the live view. In the next step, the measurement takes place and finally the relevant parameters are analyzed. That sounds like a pretty simple solution for such little lifesavers. In the next article, we will show you how easy and intuitive it is to use the Cooling Hole Application in MetMaX.