Expert Talk on Artificial Intelligence, Digital Twin and Optical Probing
There is a lot going on in the world of quality assurance and measurement technology. New technologies, new trends, and you are right in the middle of it all. Don't you sometimes wonder what makes sense with all these developments? Well, that's exactly what we asked ourselves.
Florian Schwimmer is Marketing & Sales Director at Bruker Alicona. Benjamin Anger, Senior Application Expert at the Application Competence Center. The two metrology experts have taken a look at the current trends in production metrology and explain in this interview which 3 trends you must not miss and why. If you prefer to watch the recording of the video, click here.
Florian Schwimmer & Benjamin Anger
Florian: Artificial intelligence is a somewhat anxiety-ridden topic. We always hear how AI is taking our jobs away and that we humans will be replaced by artificial intelligence in the workplace at some point. Should we be afraid of artificial intelligence in measurement technology?
Benjamin: Not at all. The opposite is the case, as I see it. Artificial intelligence will make our lives easier. The tasks that AI will do for us are repetitive and sometimes tedious. Doing the same thing over and over again. Artificial intelligence will support us with these tasks.
Florian: But does "support" mean that we will need fewer staff? Because that's exactly what scares us all.
Benjamin: I hear this question very often, but my answer is "no" every time. Instead, I see an improvement in working conditions for us. If all the tedious legwork is done by AI, we humans can concentrate on more important things. This leaves more manpower for more complex and valuable issues. We empower our employees through AI.
Florian: Okay, that means artificial intelligence allows us to put our workforce to more relevant tasks, to become more productive, because the AI takes over the boring ones. Do I understand that correctly? Does this also mean that we can reduce the susceptibility to errors by using AI?
Benjamin: Exactly, the AI does a good job in all these simple, sometimes easier, sometimes more difficult to recognize deviations that tire us humans because they are monotonous tasks that nevertheless require a high level of concentration. The error rate is reduced, and manpower is utilized in a better way. All of this leads to a higher return on investment.
Florian: And what about the speed? Such tasks can be solved more quickly by AI, right? If we humans no longer have to recognize deviations by eye, that saves time. Benjamin, can you perhaps give us a practical example of the use of artificial intelligence in metrology?
Benjamin: Sure, let's talk about the surface texture as an example. You have a certain structure, perhaps scratches and certain deviations from the drawing. In the first picture, you can see all the fine grinding grains. And what do you usually do with them? Estimate how big, deep, wide, distributed and so on they are. But that's where the AI comes in. The image below shows all the abrasive grains that the artificial intelligence has found. These are the blue dots. Nobody has to estimate anything, the AI evaluates this too.
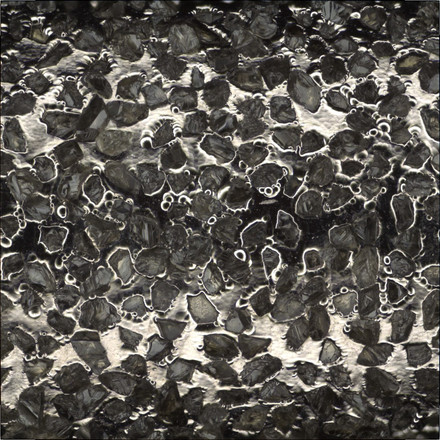
Grinding grains as detected by the human eye
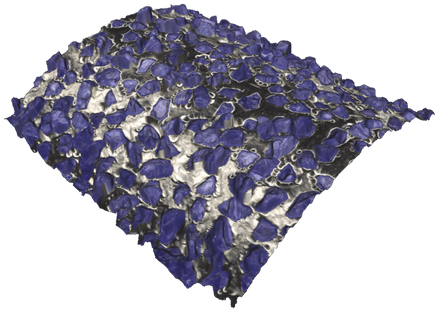
Grinding grains as detected by AI
Florian: What we see here is a grinding tool, right? The one on the left is a surface image as a human would see it and on the right, I see all the individual grinding grains that the artificial intelligence has already recognized. How does the AI know what is a grain and what is not?

Identification of Grain Tips

Benjamin: Artificial intelligence is being trained. We humans must explain to it exactly what is a grinding grain and what is not. It receives data that it uses again and again. This enables it to evaluate the quantity, distribution, height, and so on by itself. No need to sit there and count the grains.
Florian: I see a further advantage in the combination with 3D measurement technology. Artificial intelligence does a lot of the work for us that challenges or even overwhelms our visual perception. The evaluation in 3D provides extremely precise and accurate information about the height of the grains, distribution, and so on. I got that so far. But you also mentioned the training of the AI. That means that artificial intelligence is stupid without the humans who train it, right?
Benjamin: That's definitely true, yes. AI has no common sense and only does what it is taught to do. However, this is not limited to metrology. Google doesn't know anything itself either. The search engine uses data that humans have entered. Quality assurance has its own requirements, of course.
Florian: Let's summarize then: There is no need to be afraid of AI. It can reduce people's workload and free them up for more valuable activities. A company with the same workforce would then simply be more productive. In metrology, artificial intelligence is particularly strong when it comes to surface texture. No one has to use a microscope to draw conclusions about the texture. And then we have the advantage of 3D data, which also means a boost in productivity. And let's not forget: It takes manpower to train AI, after all. So Judgement Day is not just around the corner for mankind after all.
Florian: Let's talk about the digital twin now. It's a trend that everyone is talking about in a wide variety of contexts. Can you please tell us what a digital twin is?
Benjamin: Yes, I have a very simple example, namely the car. In the past, a light simply came on when something was wrong with the car. A warning light that told us that there was a need for action. Today, with newer car models, you can see the digital image of the car in front of you in the cockpit, which shows you exactly where the problem is. The rear left door is open, for example, or the tire pressure on the front right is not okay.
Florian: I also remember the days when I only had one single yellow warning light for everything in my car. And in production and measurement technology? What does digital twin mean in this context?
Benjamin: First of all, there is the general use of the term in production, which refers to the visualization of the entire production process. This provides real-time information from order receipt to the finished product and, of course, every single step in between.
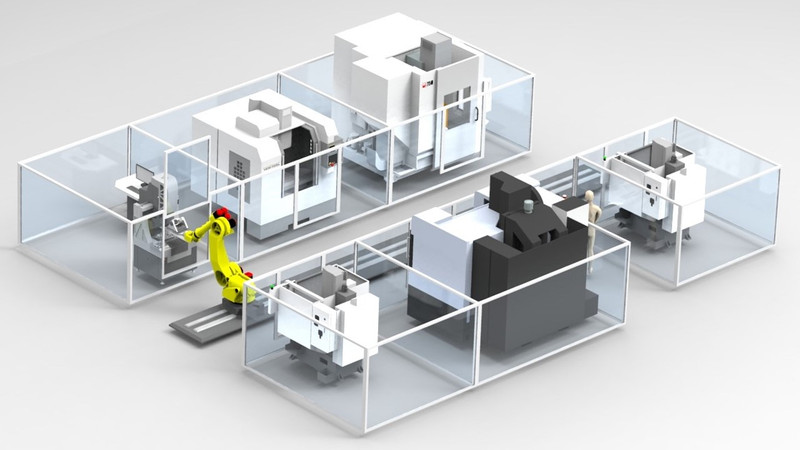
Digital twin in production
Florian: Okay, do I understand correctly: there is a status for each individual production step. Let’s hope, it’s green, but if it's not, I can immediately see where and what the problem is. So this is the digital twin in the holistic view of production. What role does measurement technology play in this context?
Benjamin: This is about providing valuable feedback via a standard interface. And in real time. The production manager or person in charge sees at one glance that the product is okay and can continue. And if this is not the case, they can react immediately.
Florian: This means that measuring devices must be as easy to integrate as possible. This gives you real-time data and allows you to see the interaction in the production process. But I also often hear the term "digital twin" in a different measurement technology context. What is a digital twin in the measuring device ecosystem?
Benjamin: The digital twin of the measuerment device makes it possible for us to create our measurement plans online and offline. Quite simply on your computer, without having to stop the ongoing measurements at all. The system can run 24/7 while you process the data in the background on the digital twin.
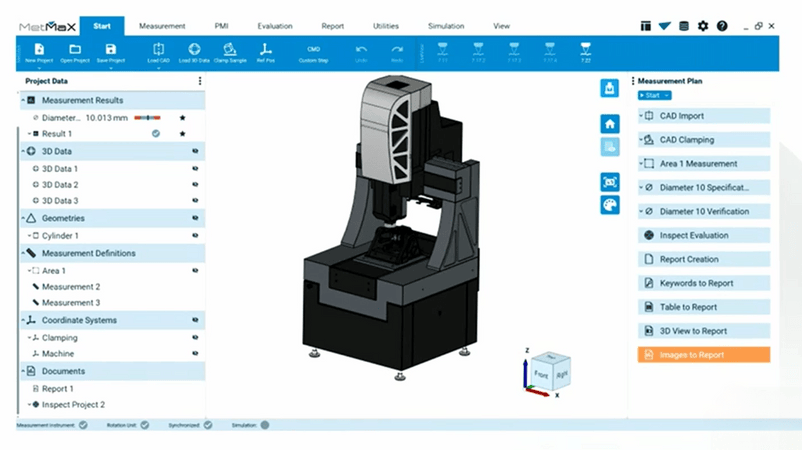
Bruker Alicona's MetMaX Software showing the digital twin of the µCMM
Florian: Of course, this is also interesting for the ROI if I know that the machine doesn't have to be stopped. We've now moved on from the big picture of the digital twin to the measurement technology twin. I would like to throw another term into the mix that I keep coming across in this context: PMI. What is it?
Benjamin: PMI stands for Product Manufacturing Information. The idea is that instead of the usual 2D drawing of the product with all the stored parameters, you have a digital twin that is also equipped with all the important manufacturing information. I'm talking about the surface profile tolerances or roughness, for example. All of this is already included in the CAD file.
Florian: So that's the "smallest" digital twin, right? The one of my product. I can see all the parameters and tolerances in 3D. I understand that this also makes it easier to understand what happens when you see a digital twin. Just like a car, isn't it? But what is the big advantage of transferring PMI to metrology?
Benjamin: It simplifies the workflow immensely. When working with a 2D drawing, you first upload the CAD file. Then you need the corresponding alignment. The datum has to be defined. The shape and position tolerances are set and only then does the measuring begin. With the Product Manufacturing Information, on the other hand, you upload your CAD and offset data, and off you go. There may be a few minor adjustments to make, but that's it.
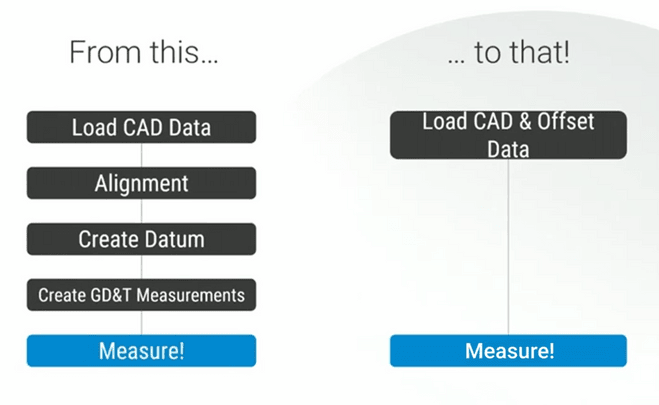
Florian: That's a good thing. You only need one step, whereas previously many complex steps were necessary. That makes the whole measurement process much more efficient. And the PMI only needs to be made available to the software - in our case MetMaX.
Florian: Let's move on to the third trend that is currently on everyone's lips, " optical probing". When I think back fifteen or only ten years, I always had to explain why we measure optically at Bruker Alicona. Customers were skeptical and thought it wouldn't work or that optical measurement technology wasn't needed. That has changed a lot. Today, customers come to us and ask specifically for optical measurement technology. Benjamin, why has optical measurement developed in this way when we have been making do with tactile measurement technology for decades?
Benjamin: I think the big buzzword behind this is "non-contact". Our optical technology measures without touching the sample. There are a whole host of industries for which this is important. Very sensitive areas such as medical technology, for example. Less contact also means that the component remains intact. But particularly small or very complex shapes are also almost impossible to measure tactilely.
Florian: I understand that. When I get a dental implant or parts in - let's say - a hip or knee, I also prefer it to have been touched as little as possible. I'm thinking of bacteria and the like. So, medical technology is pretty logical. But what are other industries that require non-contact measurement in quality assurance?
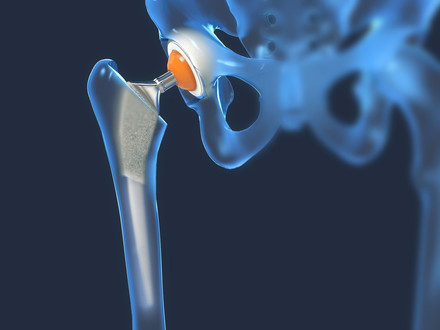
Hip prosthesis
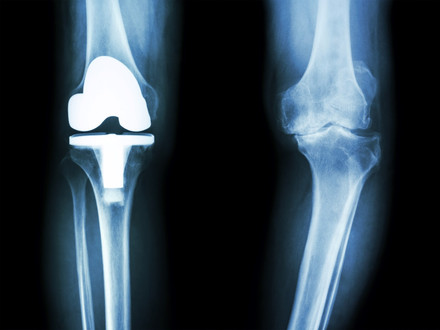
Prosthetic knee

Dental implant
Benjamin: Optical measurement technology can also easily see things that cannot be detected tactilely. Like the nozzles in the picture or the cooling holes in turbine blades, for example. What you see here are all very complex shapes and from the perspective of tactile measurement, most areas of the shapes cannot be reached with the probe.
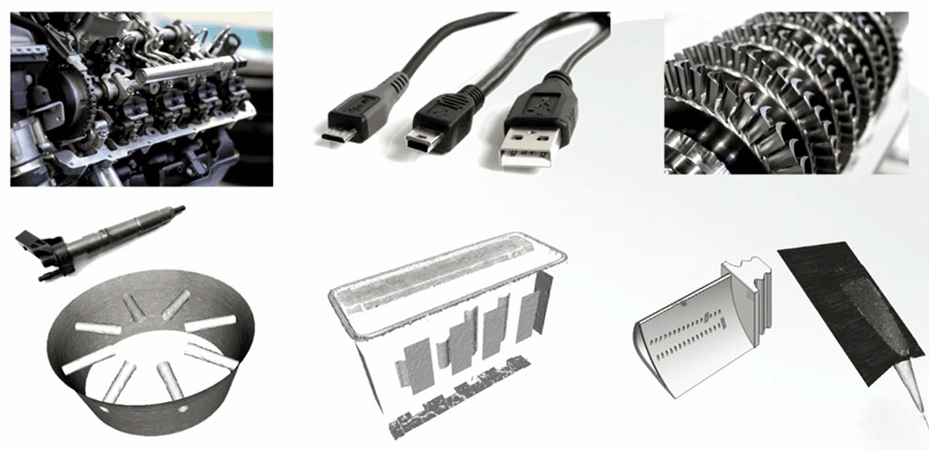
Complex shapes that cannot be reached easily with tactile measurement
Florian: I see tiny holes here that can be detected optically without moving or even touching the component. And you can also get deep into these holes, which no stylus can do. Then these USB cables and the other connectors. The same initial situation: actually inaccessible for a touch probe, but optically measurable without touching the surface. Nevertheless, tactile measuring devices have remained on the market for decades. Users have become accustomed to them - and also to the disadvantages that come with them. People hardly think about this anymore because they are so used to this type of measurement. What are the clear downsides of tactile measurement technology?
Benjamin: That's the certain imprecision and susceptibility to errors that go hand in hand with these technologies. You also risk scratching the surfaces by touching them. In concrete terms, the sample is no longer the same after measurement as it was before. Very complex probes and touch probes are required for free-form surfaces. Also, a tactile system cannot measure surfaces. You only ever draw profiles, i.e. lines. Determining the roughness in one pass together with the shape is not exactly easy either.
Florian: A bit of work is probably needed here to raise awareness, isn't it? Users compare tactile and optical devices with each other as if the results were exactly the same. And I have the feeling that they also expect the same errors or limitations that they experience with tactile devices. This is not to say that optical measurement technology has no disadvantages, but compared to tactile, these weaknesses are negligible. You measure much more realistically and closer to the original than you ever could tactilely. Users sometimes imagine it like this: I can use the stylus to measure one point at this location, then I move on to another point and so on. With optical measurement technology, I can only measure what I can see from above. But that's not true, is it? How do the Bruker Alicona measuring devices solve this?
Benjamin: We have developed a technology that can optically touch the sides of the sample, which gives us the advantage of being able to measure into the small holes or along a side wall. I admit that this still has something magical about it for me. And I haven't found anything comparable on the market.
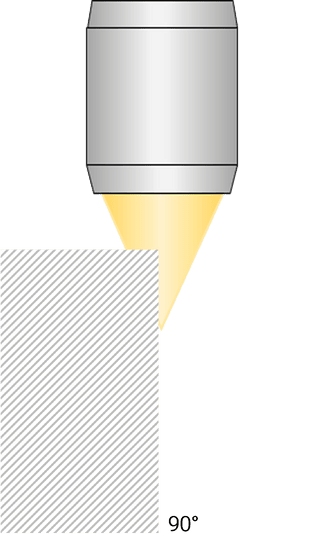
Sensor going down the side wall optically for measurement
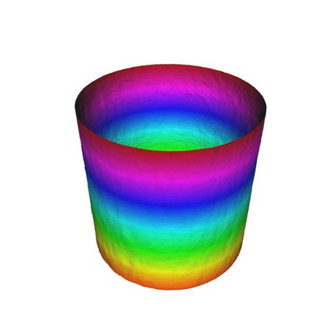
Bruker Alicona's Vertical Focus Probing of a hole
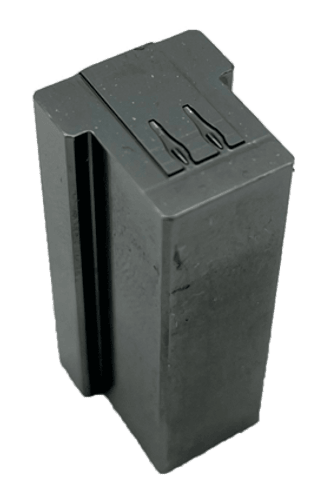
Stamp
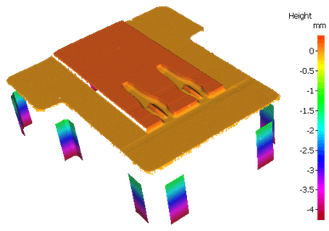
Result of Vertical Focus Probing (no movement of the stamp necessary)
Florian: When I look at this picture of the stamp now: There was no need to change the position of it for the measurement, right? It was simply measured from above. So, with optical measurement, you're not limited at all to what you can see from above. This means that tactile and optical measurements cannot be lumped together, as the tactile method already has limitations and errors from the outset. Optical measuring devices measure much more precisely, accurately, and without contact.
This also concludes our third trend, optical measurement and brings us to the end of the three trends in production metrology that you must not miss. We hope we have been able to clarify some of the current developments and allay your fears about artificial intelligence and optical metrology. Also, you now know what the digital twin is good for. You can download the full interview here. If you have any further questions or would like to find out more about Bruker Alicona technologies, please do not hesitate to contact us.